Step 3 - Seed Starting
Soil Blockers vs Seed Trays
One method removes the pot entirely; the other is what almost everyone already owns. The right answer depends on how many seeds you sow and how much of a fuss you enjoy.
Janet H. - the hands-on owner behind Janet Media Group.
Published
This page contains affiliate links. If you buy through them we may earn a commission at no cost to you, and it never decides what we recommend. How this site is funded.
A soil blocker is a press that squeezes damp mix into free-standing cubes. There is no pot: the block is both the container and the growing medium, and it sits in an ordinary tray until the seedling is planted. A cell tray is the plastic one you already know. Both grow good seedlings. They differ in cost, in time, and in what happens to the roots.
The short version. If you sow a few trays each spring, cell trays are the sensible buy -- buy thick ones and reuse them. If you sow a lot, hate potting on, or want the plastic out of the system, soil blocking is worth the learning curve, and a budget press is the right way to find out. If you are short of bench space in February, the thing that actually changes your spring is a micro blocker, not a better tray.
| Soil blocks | Cell trays | |
|---|---|---|
| Up-front cost | One tool, from pocket money to a serious spend | Low per tray, repeated if they crack |
| Ongoing cost | Mix only | Mix, plus replacing split trays |
| Time per tray | Slower -- mix to make, blocks to press | Fast -- scoop, fill, level, sow |
| Mix required | A blocking mix that holds together | Any seed-starting mix |
| Roots at the edge | Air pruned where they meet the air | Follow the cell wall around |
| Potting on | Block drops into a bigger block | Push the plug out and repot |
| Storage out of season | One small tool | Stacks of trays |
| Tolerance for neglect | Low -- blocks dry from all sides | Higher -- walls hold moisture in |
Quick picks
| # | Product | Best for | Score | Price |
|---|---|---|---|---|
| 1 | 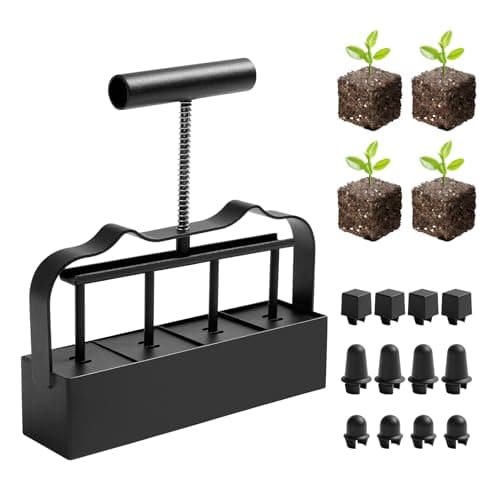 Top pickKHAMAL 4-Cell 2 in Soil BlockerFour 2 in blocks per press, three seed pin types included | Finding out whether soil blocking suits you | 8.1 | $10.49 - View on Amazon |
| 2 | 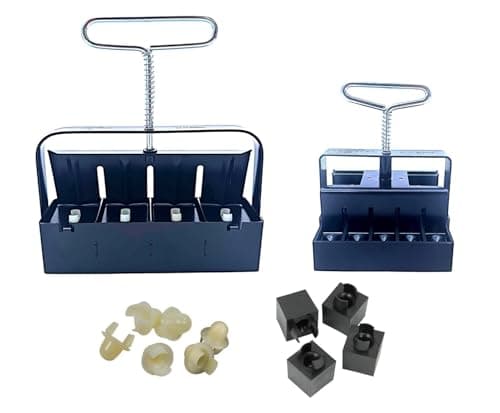 Ladbrooke 4-Piece Basics Soil Blocker SetMini 4 and Micro 20 blockers with cubic inserts and seed pins | Committing to the method properly | 9.0 | $84.95 - View on Amazon |
| 3 | 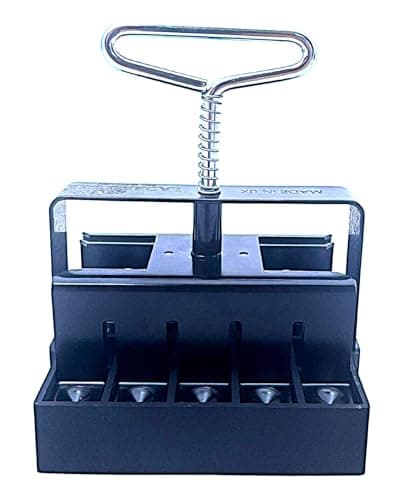 Ladbrooke Micro 20 Soil BlockerTwenty 3/4 in blocks per press | Germinating a lot of seed in very little space | 8.5 | $35.95 - View on Amazon |
| 4 | 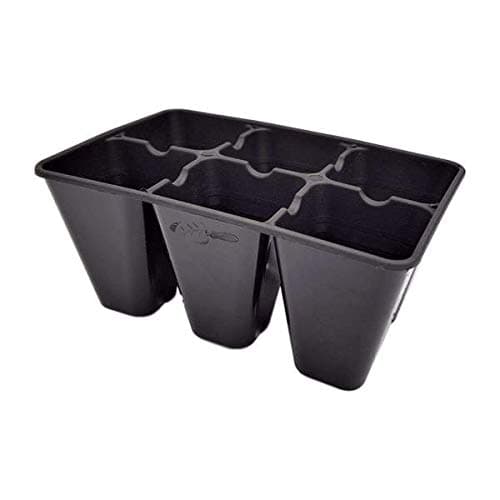 Bootstrap Farmer Extra Strength 6-Cell Seedling Trays60 inserts, 360 cells total, extra-strength plastic | A reusable version of the cell pack most people already use | 8.6 | $44.99 - View on Amazon |
| 5 | 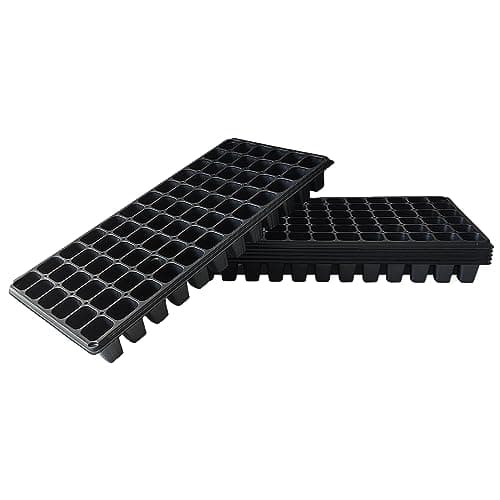 RooTrimmer Deep 72-Cell Plug Trays72 cells per 1020 tray, 2.36 in deep, 10-pack | Sowing a lot of varieties at once | 8.2 | $37.99 - View on Amazon |
| 6 | 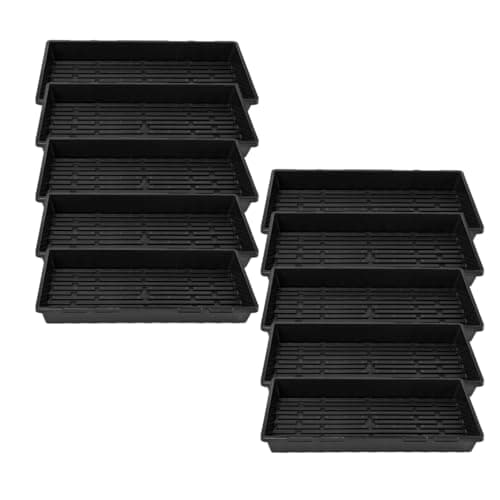 Bootstrap Farmer 1020 Seed TraysHeavy-gauge 1020 trays, reusable for years | Trays that last more than one season | 8.5 | $66.49 - View on Amazon |
#ad We may earn a commission - Price as of November 3, 2026
Scores are our own editorial judgment, formed from published specifications and independent sources. They are not aggregated customer ratings, and they are not the result of hands-on testing, which we do not currently do. See how we choose.
What actually differs: the edge of the root ball
Strip away the enthusiasm on both sides and one real difference remains. In a plastic cell, a root that reaches the wall turns and follows it. In a block, a root that reaches the edge meets air, dries at the tip and stops, and the plant puts its energy into branching behind that tip instead. That is air pruning, and it is the mechanism behind every claim made for blocking.
The practical payoff is at transplanting. A block goes into the ground as a block; nothing is pulled, torn or unwound. University of Minnesota Extension is explicit about the risk on the other side: seedlings' roots will grow into each other and are likely to be injured later during transplanting, which is why its advice is to use divided containers with a single seedling per container in the first place.
Be careful how much weight you put on this. A cell tray used properly -- one seedling per cell, potted on before it is root-bound -- produces a perfectly good transplant, and the overwhelming majority of plants sold anywhere were grown in plastic cells. Blocking makes it harder to get wrong. It does not make cells wrong.
Cost, properly counted
Blocking advocates usually say it is cheaper because you never buy another pot. Tray users say it is more expensive because the tool costs more than a decade of trays. Both are doing the arithmetic on the part that suits them.
Counted properly: blocking costs one tool, once, plus mix forever. Trays cost a little every time, plus replacements when they split, plus the 1020 flats you need in both systems anyway -- blocks have to sit in something, so a tray purchase is not avoided by blocking, only reduced. A budget press costs about what a couple of six-packs of bought transplants cost, which makes the entry cost of the method near enough to nothing. The reference tools cost many times that and are bought for how they work, not to save money.
Where blocking does save real money is in not buying transplants. If the alternative to raising your own is a flat of nursery seedlings every May, either method pays for itself in one season and the choice between them is about preference, not economics.
Time, which is the real reason people quit
Soil blocking is slower, and nobody who sells the tools enjoys saying so. Making blocks means mixing a batch to the right wetness, loading the press, ejecting the blocks in rows and repeating. Four blocks a press is the common size, so a full 1020 tray is a dozen or more presses. Filling the same tray with cells is a scoop, a level and a tap.
What blocking buys back is potting on. With a nesting pair of blockers you germinate in three-quarter-inch micro blocks and drop the survivors into the recess in a two-inch block. There is no repotting operation at all, and the seedling never notices it moved. If you currently pot on a hundred seedlings each spring, that is an afternoon saved against a morning spent.
So the time question resolves by volume and by habit. Few plants, planted straight out from their first container: trays win on time. Lots of plants, a round of potting on, and tight bench space: blocking wins.
The mix is not a detail -- it is the whole technique
The commonest reason a first attempt at blocking fails is the mix. Ordinary seed-starting mix is light and open, which is exactly what makes it good in a cell and useless in a press: it will not bind, so the block crumbles as it leaves the tool. A blocking mix needs more fine, sticky material -- usually peat or coir plus compost -- and it needs to be wetter than feels right, about the consistency of thick oatmeal.
Cell trays have no such requirement. Any commercial seed-starting mix works, and those mixes exist for good reasons: University of Minnesota Extension describes them as usually composed of peat and vermiculite, sterile, lightweight and free from weed seeds. Our best seed starting mix page covers the bagged options, and a DIY seed starting mix covers mixing your own, which is also where a blocking mix comes from. Home-made compost needs screening before it goes into one -- a bucket sifter is the cheap way to do it, covered in compost accessories worth buying.
Watering: where each method punishes you
Blocks have no walls, so they lose water from five sides at once. On a warm bench under lights, small blocks can go from damp to bone dry in a day, and a dry block does not recover gracefully -- it shrinks away from the roots. Blocking asks for a daily look and bottom watering in a solid tray, never a watering can over the top.
Cells are more forgiving of a missed day and less forgiving at the other end. Plastic walls hold moisture, which is pleasant until a tray sits wet and cold and seedlings start collapsing at the soil line. University of Illinois Extension's seed-starting troubleshooting covers that pattern, and our damping off page covers what to do about it. Both methods want bottom watering, air movement and warmth rather than a soaked surface.
One point in favor of trays that rarely gets said: if you travel, if work gets busy, or if you are simply not a daily-attention gardener, cells will carry seedlings through a lapse that would kill a tray of micro blocks. Choose for the gardener you actually are.
Hygiene, reuse and the plastic question
Reused trays carry last season's pathogens unless they are cleaned. Extension's instruction is specific: sterilize clean used containers by soaking them in a solution of bleach or other disinfectant for thirty minutes. That is a real chore, and it is the chore blocking removes entirely -- there is nothing to sterilize because there is no container.
On plastic generally, the fair position is this: blocking eliminates cell packs, not plastic. You still need 1020 flats to stand the blocks in, and most blockers use a dome or cover for germination. What it does eliminate is the annual cycle of thin packs that crack and get thrown away, which is the part most people object to. Heavy-gauge reusable trays attack the same problem from the other direction and are a legitimate answer to it.
Which to buy, by how much you sow
| What you sow in a season | Sensible choice | Why |
|---|---|---|
| One or two trays | Heavy-gauge cell trays | The tool would cost more than the seedlings; cells are quicker and more forgiving |
| Several trays, some potting on | A budget 2 in blocker, or cells | The method is worth trying at this volume and the entry cost is trivial |
| A lot of varieties, tight bench space | A micro blocker plus a 2 in blocker | Germinate many in a small area, promote only the winners |
| High-density sowing, trays preferred | 72-cell plug trays | The tray-side answer to the same density problem |
| You travel or forget to water | Cell trays | Walls hold moisture; small blocks do not forgive a missed day |
Whichever you choose, the rest of the setup is identical and matters more than this decision does. Seedlings need light within hours of emerging -- see the best grow lights for seedlings and leggy seedlings for what happens when they do not get it -- and warmth underneath helps germination, which is what seedling heat mats are for. Sowing date beats everything: when to start seeds indoors is the page to read before buying either tool.
And whatever the seedlings grew in, they need acclimatizing before they go out. How to harden off seedlings covers the week that decides whether your February work survives May. If you have a sheltered wall to do it against, a lean-to greenhouse is the structure that makes hardening off a matter of opening a door rather than carrying trays in and out.
The picks in full
Top pick
KHAMAL 4-Cell 2 in Soil Blocker
KHAMAL
The cheapest honest way into soil blocking: it makes the same 2 inch block the expensive tools make, and it costs about what a few packets of seed cost.
The usual objection to soil blocking is the entry price, and it is a fair one: the famous tools cost more than several years of plastic trays. This removes the objection. It presses four two-inch blocks, it comes with the seed pins, and it costs very little.
Two inches is the right size to start with. It holds enough mix to carry a tomato or a brassica from sowing to planting out without potting on, and it is the size every soil blocking article you will read assumes you are using.
What you give up against a machined tool is refinement. Cheaper presses flex slightly, release a little less cleanly, and are less tolerant of a mix that is marginally too dry. In practice that means a few more failed blocks while you learn how wet the mix should be -- which you have to learn anyway.
Buy this to find out whether you like the method. If you make three hundred blocks next spring and still like it, that is the point at which a better tool starts to earn its money.
What works
- Costs less than one tray of bought transplants, so the experiment is nearly free
- Makes the standard 2 inch block, which is the size most seed-starting advice assumes
- Interchangeable seed pins let you set the dibble depth to the seed rather than the tool
- Nothing to wear out in a way that matters at this price
- A sensible gift for someone curious about starting seeds without plastic
What does not
- Budget construction: expect more flex and a less crisp release than a machined tool
- Four blocks per press makes a 72-block tray a genuine arm workout
- No micro blocker, so you cannot do the two-stage block-into-block method
- Block quality depends heavily on getting the mix wet enough, and a cheap press is less forgiving of a mix that is slightly off
Skip it if: you will be making hundreds of blocks a season. A budget press is a fine way to learn the technique and a tiring way to run a production line.
| Blocks per press | Four |
|---|---|
| Block size | 2 in (manufacturer) |
| Seed pins | Three types supplied |
| Handle | Shaped grip |
| Use with | A standard 1020 tray to hold the finished blocks |
Committing to the method properly
Ladbrooke 4-Piece Basics Soil Blocker Set
Ladbrooke
The reference tools, sold as a nesting pair: 3/4 inch micro blocks to germinate in, 2 inch mini blocks to grow on in, and the inserts that let one drop into the other.
Ladbrooke is the name behind the modern soil blocker, and this is the pair of tools the method was designed around rather than a copy of them. The Micro 20 makes twenty three-quarter-inch blocks at a press; the Mini 4 makes four two-inch blocks with a recess sized to take one.
That pairing is the actual argument for spending this much. In February, bench space under lights and warmth on a heat mat are the two things in shortest supply. Germinating in micro blocks means twenty seedlings occupy the footprint four would, and only the ones that actually came up get promoted into a full-size block. Nothing is wasted on a seed that never germinated.
Potting on becomes a non-event, which is the part people underrate. The micro block drops into the recess in the mini block. There is no tugging a seedling out of a cell, no root torn away from mix, no check to growth. University of Minnesota Extension's warning about seedling roots growing together and being injured at transplanting simply does not arise.
The honest counter-argument is the price. If you sow two trays each spring, a budget press makes an identical two-inch block for a fraction of this. The set earns its money on volume and on the years you keep using it.
What works
- The two-stage method in one box: germinate twenty seeds in the space of four, pot the winners on
- Cubic inserts make a recess sized to the micro block, so potting on is a drop rather than a transplant
- Metal tools with no consumable parts -- the running cost after purchase is mix and nothing else
- Saves bench and heat-mat space in the weeks when both are scarcest
- Resale value is real; these hold their price in a way plastic trays do not
What does not
- Expensive next to a budget press that makes the same 2 inch block
- The two-stage workflow is a habit to learn, not a feature you switch on
- Micro blocks dry out fast and are unforgiving if you miss a day
- Still four blocks per press on the mini, so volume work is slow
- You need a proper blocking mix; ordinary seed-starting mix often will not hold a block
Skip it if: you only ever sow a tray or two. This is a long-term tool set at a price that only makes sense if you will use it every season.
| Includes | Mini 4 and Micro 20 blockers (manufacturer) |
|---|---|
| Mini 4 blocks | Four 2 in blocks per press |
| Micro 20 blocks | Twenty 3/4 in blocks per press |
| Inserts | Cubic inserts, so a micro block drops into a mini block |
| Seed pins | Supplied |
| Origin | Made in England (manufacturer) |
Germinating a lot of seed in very little space
Ladbrooke Micro 20 Soil Blocker
Ladbrooke
The single most space-efficient way to germinate seed indoors: twenty blocks per press, in roughly the bench area four standard blocks would take.
Space under lights is the real constraint on indoor seed starting, and this tool attacks it directly. Twenty three-quarter-inch blocks occupy about the area four two-inch blocks do, which means a single heat mat germinates several times as much seed.
The workflow it enables is worth describing. You sow everything into micro blocks, keep them warm and damp, and after a week or so you know exactly which seeds came up. Only those get promoted into full-size blocks and only those occupy the expensive real estate under the lights. The dud seed never cost you anything but mix.
The discipline it demands is watering. A block this small has very little reservoir, and a warm room will dry it out in a day. Bottom water in a solid 1020 tray, keep a dome or a cover over it until germination, and do not plan a weekend away during the first fortnight.
On its own it is a specialist tool. Bought alongside a two-inch blocker it changes how the whole February bench works, which is why the sets usually make more sense than the individual presses.
What works
- Turns one heat mat into roughly five times the germination capacity
- Ideal for fine and expensive seed where you want to see what germinates before committing space
- Works for microgreens as well as transplants
- Blocks are air pruned on every face, so roots stop at the edge instead of circling
- Pairs with the Mini 4 so potting on is a drop, not a transplant
What does not
- Small blocks dry out quickly -- miss a watering in a warm room and you lose the tray
- Only useful if you have somewhere for the seedlings to go within two or three weeks
- Not a standalone purchase for most people; the value appears when you own both sizes
- Fiddly to sow: 3/4 inch blocks want one seed each and a steady hand
Skip it if: you are not going to pot the seedlings on within a couple of weeks. A 3/4 inch block is a nursery, not a home.
| Blocks per press | Twenty |
|---|---|
| Block size | 3/4 in (manufacturer) |
| Nests with | The Mini 4 blocker, via its cubic insert |
| Origin | Made in England (manufacturer) |
| Use with | A standard 1020 tray, bottom watered |
A reusable version of the cell pack most people already use
Bootstrap Farmer Extra Strength 6-Cell Seedling Trays
Bootstrap Farmer
The familiar six-cell pack, made thick enough to survive being emptied and refilled for years rather than cracking the first time you push a seedling out.
If the complaint about trays is that they crack, split and end up in a landfill after one season, the answer is not necessarily to stop using trays. It is to buy ones thick enough to survive.
Six-cell inserts are the format most gardeners already think in, and they map neatly onto how a home garden is actually planted: six tomatoes, six peppers, six brassicas. Each cell holds a single seedling, which is precisely what University of Minnesota Extension recommends -- divided containers with one seedling each, so roots do not grow into one another and get injured at transplanting.
The extra-strength plastic matters at one specific moment: when you push a root ball out from underneath. Thin packs split along a corner the first or second time you do it. These flex and spring back, which is the difference between a consumable and a tool.
The maintenance is not optional. Extension's advice for reused containers is to sterilize them by soaking in a bleach or disinfectant solution for thirty minutes. Skip that and reusable trays become a way to carry last year's damping-off into this year's seedlings.
What works
- Divided cells, which is exactly what Extension recommends -- one seedling per cell, roots kept apart
- Thick enough to flex when you push a root ball out instead of splitting
- Fits the 1020 standard, so your existing trays, domes and heat mats all still work
- Sixty inserts covers a serious spring without buying more
- Washable and sterilizable, which is how you reuse containers without carrying disease over
What does not
- Still plastic, and still a thing to store for eleven months of the year
- Six cells to a 1020 insert footprint means relatively few, relatively large cells -- not a high-density germination tray
- Seedlings left too long go root-bound in a cell in a way they cannot in a block
- Needs washing and disinfecting between seasons or the convenience becomes a damping-off risk
Skip it if: you sow one tray a year. The economics only work if you reuse them season after season, which is also the only way the plastic case closes.
| Quantity | 60 inserts, 360 cells (manufacturer) |
|---|---|
| Format | 6-cell inserts for a standard 1020 tray |
| Gauge | Extra strength, substantially thicker than standard packs |
| Reuse | Designed for repeated seasons |
| Use with | A 1020 tray, bottom watered |
Sowing a lot of varieties at once
RooTrimmer Deep 72-Cell Plug Trays
RooTrimmer
High-density plug trays with enough depth to be useful: seventy-two cells in a standard footprint, which is the tray-side answer to a micro blocker.
A 72-cell plug tray is the tray world's answer to the micro blocker: the way to germinate a great many seeds in the space one flat occupies. For anyone who grows ten varieties of tomato or sows successions of brassicas, that density is the whole point.
Depth is where these differ from the cheap ones. Most 72-cell trays are barely an inch and a half deep, which is enough to germinate and not much more. At a little over two and a third inches there is real root room, so the window between germination and potting on is weeks rather than days.
The trade is the same one every small cell makes: little reservoir, fast drying, and a hard deadline. Leave a 72-cell tray a fortnight too long and you will be pulling out plugs that have wound round themselves, which is the root-bound failure that soil blocks are designed to avoid.
Bottom water them in a solid 1020 flat rather than watering over the top. Small cells wash out, and surface watering is also how damping off spreads along a tray.
What works
- Seventy-two cells in one footprint, so a whole season's varieties fit under one light
- Deeper than most 72-cell trays, which buys real root room before potting on
- Cheap enough per cell that losing a few to poor germination costs nothing
- Standard 1020 footprint, so it drops into trays and domes you already own
- Rigid enough to lift when full, which thin plug trays are not
What does not
- Small cells dry out fast and need watching daily under lights
- Seedlings outgrow a 72-cell plug quickly -- expect to pot on, not plant straight out
- Pushing a plug out of a small cell is where roots get torn if you are rough or late
- Ten trays is a lot of plastic to store for a backyard garden
Skip it if: you grow only a handful of plants. Seventy-two cells of one crop is a market garden's problem, not a backyard's.
| Cells per tray | 72 |
|---|---|
| Footprint | 21.25 x 11 in (manufacturer) |
| Depth | 2.36 in (manufacturer) |
| Quantity | 10 trays |
| Use with | A standard 1020 flat for bottom watering |
Trays that last more than one season
Bootstrap Farmer 1020 Seed Trays
Bootstrap Farmer
Thick enough to pick up full without folding, which is the entire complaint about cheap trays and the reason these cost more.
Anyone who has carried a cheap 1020 tray full of wet compost knows the failure mode: it folds in the middle and the seedlings go on the floor. Heavy-gauge trays do not do that.
The 1020 name is a standard footprint, roughly 10 by 20 inches, and it is worth sticking to. Every humidity dome, heat mat, cell insert and shelf is built around it.
Buy a couple of solid, undrained trays alongside the drained ones. A solid tray underneath lets you water from below, which is gentler on small seedlings than watering from above and keeps the leaves dry.
What works
- Can be lifted full of wet medium without collapsing
- Lasts many seasons rather than one
- Standard 1020 footprint fits every dome and mat
- Solid trays double as reservoirs for bottom watering
What does not
- Several times the price of disposable trays
- Only worth it if you actually reuse them
- Heavier to store in quantity
Skip it if: you start one tray a year. The economics only work once you are reusing them season after season.
| Type | 1020 standard seedling trays |
|---|---|
| Gauge | Heavy-duty, substantially thicker than standard |
| Drainage | Drain-hole and solid versions sold |
| Compatibility | Fits standard domes, mats and inserts |
Common questions
Are soil blockers better than seed trays?
Better at one specific thing: roots. A block is open to the air on every side, so roots stop at the edge rather than circling a plastic wall, and the block goes into the ground without being pulled out of anything. Trays are quicker to fill, more forgiving if you miss a watering, and perfectly capable of producing good transplants when each cell holds one seedling and the seedling is moved on before it gets root-bound.
Do you need a special soil mix for soil blocking?
Effectively, yes. Standard seed-starting mix is light and open, which is what makes it good in a cell and poor in a press -- it will not bind, so blocks crumble on release. A blocking mix carries more fine, sticky material, usually peat or coir plus sieved compost, and it is mixed much wetter than feels right: squeeze a handful and it should ooze.
What size soil blocker should a beginner buy?
The 2 inch, four-block size. It holds enough mix to carry a tomato or a brassica from sowing to planting out without potting on, and it is the size most seed-starting advice assumes. The 3/4 inch micro blocker is worth adding later if bench space is short, because it germinates many more seeds in the same area and nests into the 2 inch block.
How often do you water soil blocks?
Check daily and water from below. Blocks lose moisture from five faces instead of one, so a warm bench under lights can dry small blocks out within a day, and a block that dries fully shrinks away from its roots. Stand them in a solid 1020 tray, add water to the tray and let the blocks draw it up; never water over the top, which erodes them.
Can you reuse plastic seed trays?
Yes, and heavy-gauge ones for years, but they need cleaning first. University of Minnesota Extension's guidance is to sterilize clean used containers by soaking them in a bleach or other disinfectant solution for thirty minutes. Reusing unwashed trays is one of the easier ways to carry damping-off pathogens from one season into the next.
Is soil blocking cheaper than buying trays?
Over several seasons, usually yes, but not dramatically. You buy a tool once and then only mix, where trays are bought again when they split. The catch is that blocks still need a 1020 flat to sit in, so blocking reduces plastic purchases rather than ending them. The big saving in both systems is not buying nursery transplants.
How many blocks does a soil blocker make at once?
The standard home tool presses four 2 inch blocks at a time, and the micro version presses twenty 3/4 inch blocks. Four at a time means a full 1020 tray takes a dozen or more presses, which is the main reason blocking takes longer per tray than filling cells does.
Sources
Factual claims on this page are backed by the published sources below, and product specifications are the manufacturers’ own. Where a figure is not published, we say so rather than estimating it.