Step 1 - Raised Beds
The Best Drip Irrigation for Raised Beds
Raised beds drain faster than the ground, which means they dry out faster too. This is the cheapest fix for the problem that ends most first gardens.
Janet H. - the hands-on owner behind Janet Media Group.
Published
This page contains affiliate links. If you buy through them we may earn a commission at no cost to you, and it never decides what we recommend. How this site is funded.
For a single 4 x 8 ft raised bed, the Rain Bird GARDENKIT is the one to buy: pre-spaced emitter tubing sized for exactly that bed, plus the pressure regulator and filter that budget kits leave out. For three or more beds, a bulk kit such as the MIXC 230 ft system costs far less per bed and lets you set the flow plant by plant. If you would rather not think about layout at all, the pre-assembled Garden Grid drops into a 3 x 6 bed and waters the whole surface evenly. Whichever you choose, add a tap timer -- the Orbit B-hyve XD is the part that turns a kit into a system that runs while you are away.
A soaker hose is the honest budget alternative and still a large improvement on hand watering, with one caveat this page is specific about: it does not water evenly along its length.
Why raised beds need this more than the ground does
The drainage that makes a raised bed work is also what makes it dry out. A bed is a container: water moves down and out through the base faster than it does in native soil, the sides are exposed to sun and wind on all four faces, and the mix in it is deliberately lighter and more porous than garden dirt. In midsummer a 10 in deep bed of good mix can need water daily.
Hand watering fails for three reasons that have nothing to do with willingness. It wets the surface and not the root zone, because a hose over a bed for thirty seconds looks like plenty and is not. It wets the leaves, which is how fungal disease spreads. And it stops the week you travel, which in August is the week the crop is set.
Drip fixes all three. It delivers water slowly at the soil surface so it soaks down rather than running off, it keeps foliage dry, and on a timer it does not care that you are away. Extension guidance puts the water saving from drip over overhead watering at up to 75%, which in a drought restriction year can be the difference between a garden and no garden.
How much water a bed actually needs
The standard target from extension services is about one inch of water per week for most vegetables, more in heat and in sandy or very free-draining mixes. That figure is easy to turn into a run time, and doing the arithmetic once is worth more than any amount of guessing.
- Work out the volume. One inch of water over one square foot is 0.623 gallons. A 4 x 8 ft bed is 32 sq ft, so one inch over the whole bed is about 20 gallons.
- Work out your system's flow. The Rain Bird kit above puts 70 emitters at 0.8 gph on the bed: about 56 gallons per hour.
- Divide. 20 gallons at 56 gph is a little over 20 minutes a week of running -- in practice split into two or three shorter runs rather than one.
- Then check the soil, not the clock. Run it, wait an hour, and dig down two inches with your fingers. Damp at two inches is right. Dry means run longer; soggy means run less.
What a drip system is made of
Extension guidance describes a home drip system as five parts, and understanding them is the whole of what you need to know to buy sensibly.
- A filter. The fine grit in ordinary tap or well water will block emitters. A 150-mesh filter washer is the usual minimum and often comes as part of the regulator fitting.
- A pressure regulator. Household pressure is typically far above the 10 to 30 psi drip tubing is designed for. Without a regulator, emitters pop off and fittings leak. This and the filter are the two parts cheap kits omit.
- A mainline. Half-inch tubing that runs from the tap past your beds.
- Drip lines or emitter tubing. Quarter-inch tubing that goes into each bed, either with emitters molded in at a set spacing or with emitters you place yourself.
- A timer. Not strictly part of the plumbing, and the part that decides whether the system is used.
If you remember only one thing from this page, make it the regulator and filter. They cost a few dollars, they are the parts that fail a system without them, and they are the reason the per-bed kit recommended above is worth more than a cheaper one.
Quick picks
| # | Product | Best for | Score | Price |
|---|---|---|---|---|
| 1 | 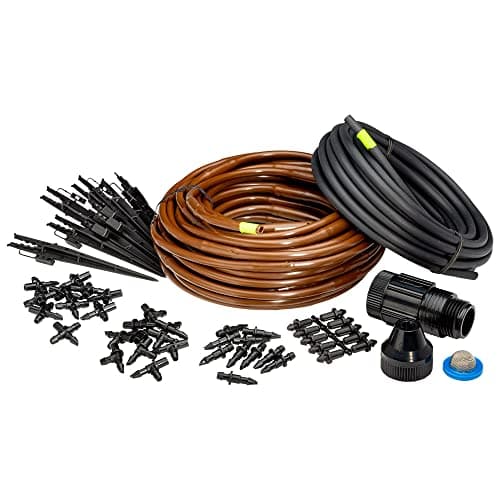 Top pickRain Bird GARDENKIT Drip Irrigation Kit35 ft of emitter tubing, emitters every 6 in at 0.8 gph | One 4 x 8 ft bed, done properly | 9.0 | $51.29 - View on Amazon |
| 2 | 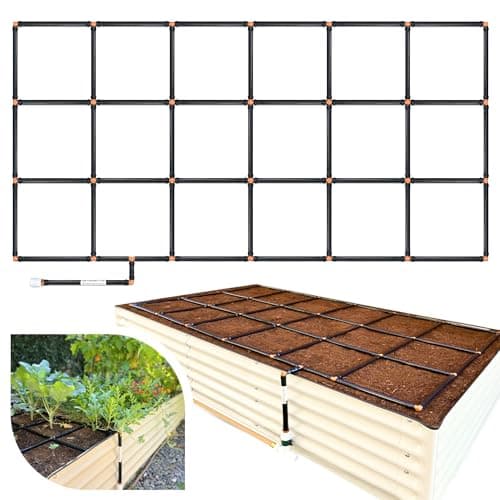 Garden Grid 3 x 6 Watering SystemPre-assembled 33.5 x 66 in grid, 18 squares, 16 streams each | Even coverage with no assembly thinking | 8.5 | $89.99 - View on Amazon |
| 3 | 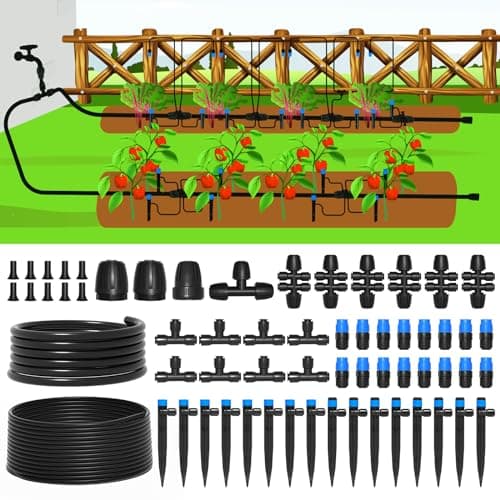 MIXC 230 ft Quick-Connect Drip Irrigation Kit230 ft of 1/2 in and 1/4 in tubing with adjustable emitters | Three or more beds from one tap | 8.0 | $37.99 - View on Amazon |
| 4 | 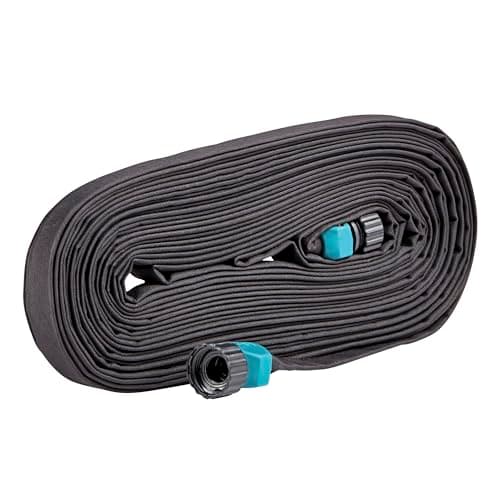 Gilmour Flat Weeper Soaker Hose, 50 ft50 ft flat hose that seeps along its whole length | The cheapest watering that is still an upgrade | 7.6 | $16.99 - View on Amazon |
| 5 | 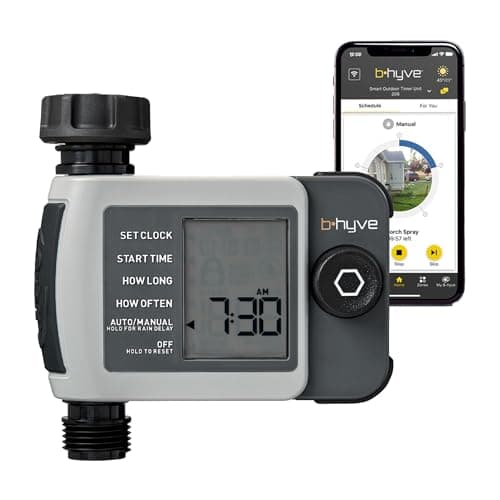 Orbit B-hyve XD 1-Port Smart Hose TimerSingle-outlet tap timer, programmable on the unit or by app | Making any of the above automatic | 8.7 | $36.10 - View on Amazon |
#ad We may earn a commission - Price as of October 12, 2026
Scores are our own editorial judgment, formed from published specifications and independent sources. They are not aggregated customer ratings, and they are not the result of hands-on testing, which we do not currently do. See how we choose.
Which layout suits which garden
| Your garden | Buy this | Why |
|---|---|---|
| One 4 x 8 bed | A per-bed kit with pre-spaced emitter tubing | Right parts, right quantities, nothing to design |
| One 3 x 6 bed, no appetite for parts | A pre-assembled grid | Arrives as a grid, connects to a hose, cannot be laid out wrong |
| Three or more beds | A bulk tubing kit plus a regulator and filter | Lowest cost per bed and one circuit serves all of them |
| Mixed beds and containers | Bulk tubing with adjustable emitters | A squash and a row of radishes want different amounts on the same line |
| Tight budget, one or two beds | Flat soaker hose | A real improvement on a watering can for very little money |
| Any of the above, if you travel | Add a tap timer | The kit only pays for itself when it runs without you |
Emitter spacing, and where the water actually goes
Water from a single emitter does not spread sideways as far as people expect. It soaks down in a narrow cone, wider in a mix with plenty of compost and narrower in a sandy one. That has two consequences for a raised bed.
First, spacing matters. Emitter tubing at 6 in spacing wets a continuous strip along the line, which suits close-planted rows -- carrots, salad, beans, anything sown in a drill. Widely spaced individual emitters suit single large plants: one emitter per tomato, squash or pepper, placed a few inches from the stem rather than against it.
Second, the number of lines matters. A 4 ft wide bed wants two or three parallel runs rather than one down the middle, or the outer rows stay dry while the center is watered. This is the commonest layout mistake in a first drip install, and it is why a pre-assembled grid, which cannot miss, is worth considering for a first bed even at a higher price.
Installing it: the order that avoids rework
- 1
Plan on paper first
Sketch the beds, the tap and the route between them. Mainline past the beds, branch lines into each. Ten minutes here saves cutting tubing twice.
- 2
Fit the filter and regulator at the tap
In that order, before any tubing. If you are using a timer, it goes between the tap and the filter.
- 3
Lay the mainline before planting
Run it along the outside of the beds, not across paths where it will be stepped on or run over by a mower.
- 4
Run the lines in the bed and pin them down
Two or three parallel runs in a 4 ft bed, held with landscape staples so they stay put when you plant around them. Leave the ends accessible so you can flush the lines.
- 5
Flush, then pressure-test with the ends open
Let water run through for a minute to clear manufacturing debris before you cap the ends. Then close the ends and walk the lines looking for leaks and kinks.
- 6
Set a run time, then adjust from the soil
Start with the arithmetic above, then dig down two inches an hour after a run and adjust. Re-check in a heatwave and again in fall -- the right run time changes through the season.
What goes wrong, and the fix
| Symptom | Usual cause | Fix |
|---|---|---|
| Fittings popping off or leaking | No pressure regulator | Fit a 25 psi regulator at the tap |
| Some emitters dead, others fine | Grit in the lines | Fit a 150-mesh filter and flush the lines through with the ends open |
| Far end of the bed dry | Run too long, or non-compensating emitters | Shorten runs, or use pressure-compensating emitter tubing |
| Outer rows dry, middle wet | One line down the center of a wide bed | Add parallel lines; two or three in a 4 ft bed |
| Plants wilting although the timer runs | Run too short -- surface wet, root zone dry | Water deeper and less often; check soil two inches down |
| Split tubing in spring | Water left in the lines over a hard freeze | Disconnect, drain and store the timer and regulator before the first hard frost |
Well water, hard water and clogging
Emitters are the part that fails, and they fail for one of two reasons: particles or minerals. Particles -- sand, rust flakes, pipe scale -- are what the 150-mesh filter is for, and if you are on a well you should expect to clean that filter screen a few times a season rather than once. It unscrews, rinses under a tap and goes back.
Minerals are the slower problem. Hard water leaves deposits inside the emitter orifice over several seasons, and the symptom is a line that waters less and less while nothing looks wrong. Two habits deal with it: flush the lines by opening the far ends for a minute at the start of each season, and if you see output dropping across a whole line, replace the emitter tubing rather than trying to clean individual emitters. Tubing is the cheapest part of the system.
If your supply is heavily silted, step up from the washer-style filter to an inline Y-filter with a removable screen. It costs a few dollars more and is far quicker to service, which in practice means it actually gets serviced.
Containers and grow bags on the same system
Containers and fabric bags dry out faster than any raised bed -- more surface area, less volume, and air moving through the sides of a fabric pot. They are also where drip pays off most, because a potted tomato in July is a once- or twice-daily job by hand.
Run a 1/4 in branch off the mainline to each pot and use one adjustable emitter per container, turned up relative to the bed emitters. Keep containers on their own circuit or their own timer program if you can: a bed wants a long soak two or three times a week, and a 10-gallon fabric bag wants a short run every day in heat. Putting both on one schedule means one of them is always wrong. The best grow bags for vegetables covers the sizes each crop needs.
Winterizing, in one paragraph
Before the first hard freeze, shut off the tap, take the timer, filter and regulator indoors, open the far ends of the lines and let them drain. Tubing can stay in the bed under mulch; water left inside a fitting or a timer body is what splits things. Five minutes in October saves replacing parts in April.
One more pairing worth knowing: steady moisture is also the real fix for blossom-end rot on tomatoes, which gets blamed on calcium far more often than it should. A bed on drip, fed properly in spring, is most of the answer -- see the best fertilizer for raised beds for the other half, and the best raised beds for tomatoes for the bed depth that makes the difference.
The picks in full
Top pick
Rain Bird GARDENKIT Drip Irrigation Kit
Rain Bird
The kit to buy first: the right parts in the right quantities for a single standard bed, including the pressure regulator and filter most cheap kits leave out.
What separates this from a bargain kit is the two parts nobody wants to pay for. Household water pressure is far higher than drip tubing is designed for, so the 25 psi regulator is what stops emitters blowing off their barbs; the 150-mesh filter washer is what stops the fine grit in your supply clogging them. Kits without both are cheaper and fail sooner.
The emitter tubing is the other reason to start here. With emitters already molded in at 6 in spacing you simply lay the line down the bed, and the pressure-compensating design means the last emitter on the run delivers the same 0.8 gph as the first -- which plain soaker-style tubing does not.
Seventy emitters at 0.8 gph is about 56 gallons an hour for the bed, so run times are short: 20 to 30 minutes is a meaningful watering in most soils. Start there, dig down two inches afterward, and adjust from what you find.
What works
- Includes the pressure regulator and filter, which are the parts that decide whether drip lasts a season or five
- Pre-spaced emitters at 6 in: no punching, no guesswork, even wetting along the row
- Pressure-compensating emitters deliver the same flow at the far end of the line as the near end
- Quantities match one standard 4 x 8 bed, so there is little waste
- Rain Bird parts are stocked everywhere, so repairs and extensions are easy
What does not
- One kit really is one bed -- a second bed means a second kit or bulk parts
- No timer included, so it is only automatic once you add one
- 6 in emitter spacing suits close rows better than widely spaced single plants
- 1/4 in tubing is easy to kink if you route it carelessly
Skip it if: you have four or more beds. At that point a bulk tubing kit and a manifold costs less per bed than buying this four times.
| Covers | Up to a 4 x 8 ft raised bed |
|---|---|
| Emitter tubing | 35 ft of 1/4 in tubing, 70 built-in emitters at 6 in spacing |
| Emitter flow | 0.8 gph each, pressure-compensating |
| Also included | 25 ft of 1/4 in distribution tubing |
| Pressure control | 25 psi regulator with 150-mesh filter washer |
| Connection | 3/4 in faucet to 1/4 in tubing adapter |
Even coverage with no assembly thinking
Garden Grid 3 x 6 Watering System
Garden In Minutes
The pick for anyone who wants watering solved without a parts list: it arrives as a grid, drops into the bed, and connects to a hose.
This is the opposite philosophy to a tubing kit. Instead of designing a layout, you buy a grid the size of the bed and lay it on top. For a first productive garden that is a genuine advantage: the single commonest drip-kit failure is a layout that misses half the plants, and a grid cannot miss.
The 11-inch squares also do a second job, which is marking out planting positions. People who garden by square foot end up drawing this grid anyway.
The trade-offs are size and price. It fits a 3 by 6 ft bed and nothing else, it costs several times what the same bed costs to irrigate in tubing, and because it wets the entire surface rather than only the root zones, you will see more weed germination between plants than with a drip line. Mulch over the top helps with both the look and the weeds.
What works
- No layout decisions: the grid waters the whole bed surface evenly by design
- Doubles as a square-foot planting guide, which genuinely helps a first garden
- No emitters to punch, no tubing to cut, no fittings to lose
- Flow is adjustable from a drip to a full stream at the tap
- Internal filter built in rather than sold separately
What does not
- Several times the price per bed of a tubing kit
- Fixed dimensions -- you buy the grid that matches the bed, or it does not fit
- Sits on the surface, so it is visible and has to be lifted to plant or mulch under
- Streams wet the whole surface, which encourages weed seed to germinate between plants
Skip it if: your beds are not close to 3 x 6 ft. The grid is a fixed size, and a bed it does not fit is money wasted.
| Assembled size | About 33.5 x 66 in |
|---|---|
| Layout | 18 planting squares, each about 11 x 11 in |
| Delivery | 16 gentle streams per square, flow adjustable at the tap |
| Material | LLDPE tubing, the type used for drinking water lines |
| Filtration | Internal mesh filter against incoming debris |
| Max pressure | 50 psi |
| Assembly | Four-piece, no tools, connects to a garden hose |
Three or more beds from one tap
MIXC 230 ft Quick-Connect Drip Irrigation Kit
MIXC
The bulk option: enough tubing, fittings and adjustable emitters to plumb a whole garden, at a price per bed nothing else here matches.
Once you have three or four beds, buying a per-bed kit for each one stops making sense. A bulk kit gives you a 1/2 in mainline to run past all of them and 1/4 in branch lines into each, which is how an irrigation system is actually supposed to be built.
Adjustable emitters are the real reason to choose this layout over fixed emitter tubing. In a mixed bed, a squash plant and a row of radishes want very different amounts of water, and an adjustable emitter at each planting position lets you do that on one circuit.
Two cautions. Check the listing for a pressure regulator and filter and add them if they are missing -- household pressure will pop fittings off this tubing. And spend ten minutes sketching the run before you cut anything; cut tubing is not uncut.
What works
- Enough material for several beds, at the lowest cost per bed of any kit here
- Adjustable emitters let you give a tomato more than a lettuce on the same line
- Quick-connect fittings make changes and repairs quick without tools
- Easy to extend later -- the parts are a standard size
What does not
- You design the layout, and a bad layout waters unevenly
- Adjustable emitters drift out of adjustment and need an occasional check
- Generic-brand fittings are less durable than Rain Bird or Netafim parts
- Verify a pressure regulator and filter are in the box; without them emitters clog and pop
Skip it if: you want it working in twenty minutes. Bulk kits are a small plumbing project, and the design decisions are yours.
| Tubing | 230 ft total, 1/2 in mainline plus 1/4 in branch line |
|---|---|
| Connections | Quick-connect fast-lock fittings |
| Emitters | Adjustable, so flow is set per plant |
| Layout | Mainline along the beds, branch lines and emitters where you choose |
| Not included | Timer; check the listing for whether a regulator and filter are supplied |
The cheapest watering that is still an upgrade
Gilmour Flat Weeper Soaker Hose, 50 ft
Gilmour
Not as precise or as even as drip, but a fraction of the price and still a real improvement over standing there with a hose.
A soaker hose is the honest budget answer, and it is worth being clear about what it is and is not. It wets the soil rather than the leaves, it loses almost nothing to evaporation, and it costs a fraction of a drip kit. Those are the same three benefits drip is sold on.
What it does not do is deliver evenly. Water leaves the hose wherever pressure is highest, which is near the tap, so the first few feet are wettest and the far end is driest. You can reduce that by running it at low pressure, keeping runs short -- 25 ft of effective length rather than 50 -- and putting the thirstiest plants nearest the connection.
Cover it with mulch. Uncovered, a flat hose is cooked by UV and will split sooner; covered, it lasts longer and the bed looks finished.
What works
- By far the lowest cost per bed of anything here
- Nothing to assemble -- connect it, lay it, open the tap part way
- Lies flat, so mulch covers it easily and tidily
- Flat profile coils flat for storage and disappears under mulch
What does not
- Delivery is uneven: the tap end always gets more water than the far end
- No way to know how much water you have applied without checking the soil
- Flat hose kinks and blocks if you bend it tightly around a corner
- Shorter service life than rigid drip tubing, especially in sun
Skip it if: you want measured, even delivery. A soaker hose puts out more water at the tap end than the far end, and no spec sheet will tell you how much.
| Length | 50 ft |
|---|---|
| Type | Flat weeper hose, seeps along its full length |
| Layout | Snakes along rows or around plants; lies flat under mulch |
| Pressure | Run at low pressure; a regulator is recommended, not supplied |
Making any of the above automatic
Orbit B-hyve XD 1-Port Smart Hose Timer
Orbit
The part that turns a drip kit into a watering system. One outlet, app scheduling, and a season on two AA batteries.
Drip irrigation only pays for itself when it runs without you. A tap timer costs less than a replacement set of tomato plants and removes the failure that actually ends most first vegetable gardens: a week of travel in August.
This is the single-outlet model, and the connectivity distinction matters because the listings are confusing. On its own it programs at the tap and over Bluetooth when you are standing next to it. Remote control and weather-based adjustment from anywhere need Orbit's separate Wi-Fi hub, which is sold on its own and with the 2-port versions.
Set it for short, frequent runs rather than one long soak in hot weather, and keep checking the soil by hand for the first fortnight. A timer automates the watering; it does not know what your soil is doing.
What works
- Removes the one thing that kills vegetable gardens: forgetting to water
- Programmable at the tap, so it works without a phone
- Multiple start times a day, which suits short drip runs in hot weather
- Battery life measured in seasons, not weeks
- Weather-based adjustment once the hub is added
What does not
- Wi-Fi and remote access need a separate hub purchase
- A single outlet means one circuit -- more beds than one circuit can supply needs a splitter or the 2-port model
- An automatic timer waters a dead plant as faithfully as a live one, so keep checking the beds
- Must be removed and drained before a hard freeze
Skip it if: you want to control it from the office. Wi-Fi and remote scheduling need Orbit's separate hub; this model on its own is Bluetooth and on-unit control.
| Outlets | One |
|---|---|
| Control | On the unit, or locally over Bluetooth with the B-hyve app |
| Remote control | Requires Orbit's separate Wi-Fi hub |
| Scheduling | Up to 4 start times per program |
| Weather | Local weather data used to adjust watering when hub-connected |
| Power | Two AA batteries, typically a full season |
Common questions
Is drip irrigation worth it for raised beds?
Yes, and more so than for in-ground gardens, because a raised bed drains and dries faster. It waters the root zone rather than the leaves, cuts water use substantially against overhead watering, and on a timer it keeps the bed alive while you are away -- which is the failure that ends most first vegetable gardens.
How long should I run drip irrigation on a raised bed?
Start from the arithmetic: one inch of water over a 4 x 8 ft bed is about 20 gallons, so a kit delivering around 56 gallons per hour needs roughly 20 minutes a week, split into two or three runs. Then check by digging down two inches an hour afterward -- damp at two inches is right.
How many drip lines does a 4 ft wide bed need?
Two or three parallel runs. Water from an emitter soaks downward in a narrow cone rather than spreading sideways, so a single line down the middle of a 4 ft bed leaves the outer rows dry. This is the most common first-install mistake.
Do I need a pressure regulator for a drip kit?
Yes. Household water pressure is well above the 10 to 30 psi drip tubing is designed for, and without a regulator fittings leak and emitters blow off their barbs. Pair it with a 150-mesh filter to keep grit out of the emitters. Kits that omit both are the ones that fail in the first season.
Is a soaker hose as good as drip irrigation?
Not as even, but far better than hand watering and much cheaper than a drip kit. A soaker hose releases more water near the tap than at the far end, so keep runs short, use low pressure, and put the thirstiest plants nearest the connection. Mulch over it to protect it from UV.
Can I use drip irrigation with a mulched bed?
You should. Lay the tubing on the soil surface and mulch over the top: the mulch cuts evaporation, shields the tubing from sunlight that makes it brittle, and suppresses the weed germination that surface watering encourages. Leave the line ends accessible so you can flush them.
Sources
Factual claims on this page are backed by the published sources below, and product specifications are the manufacturers’ own. Where a figure is not published, we say so rather than estimating it.